Don’t miss out! Wishlist us on Steam for exciting updates!
Join our mischievous, yet lovable agent on a cool and funny mission to save the world! In this gun-heavy platformer, you’ll navigate through hilarious challenges, hone your skills, and enjoy a side-splitting story. Get ready for an unforgettable adventure where the fate of the world rests in your hands!
Please note that the current look and feel are in the early stages and will evolve into something even more amazing in the final version.
Hey there, fellow gamers aged 14-16! We’re conducting a research study for an upcoming platform shooter game, and we need your help! If you’re into platform shooters and enjoy funny moments, this might be for you!
Picture this: a gun-heavy game with an epic story that will blow your mind! We want to create a game that rocks your socks off with exciting gameplay and hilarious storytelling. But here’s the best part: you can be part of shaping this game and making it even more awesome!
By joining our research study, you’ll get the chance to score a $25 gift card for your favorite online store. We’re giving away one incredible gift card to a lucky participant selected.
Ready to jump into the action? Complete this quick screener to apply for the study:
The 30 little Tricks from Jan Willem Nijman to Juice up your Game
I collected all the 30 tricks on the youtube video from Jan Willem Nijman in this article. Basically the trick name and a little tiny explanation. It’s actually just for my own convenience. But hey if it’s helpful for you, you are welcome.
1. Basic Animations & Sounds
Makes walking, jumping, picking up things, and shooting more fun. It doesn’t really matter if it’s high quality or simple. It makes it alive.
2. Lower Enemy HP
It’s more fun. It’s super frustrating if you need to shoot ten times on an enemy before he dies, makes your weapon feel feeble and boring.
3. Higher Rate of Fire
It’s a video game about shooting so put more bullets in there. You hardly can overdo it. Really. Just add more bullets. Give your weapon a higher fire rate.
4. More Enemies
Because of juice number 2 you need more enemies to shoot. It’s satisfying if they pop like popcorn.
5. Bigger Bullets
Don’t use realistically sized bullets as it looks so silly, make them big. The player wants to see those badass killer bullets. The weapon feels much more powerful.
6. Muzzle Flash
Just make the first bullet frame a circle. Very simple, very effective.
7. Faster Bullets
Slow bullets are lame, make it faster.
8. Less Accuracy
If your gun is not too accurate it looks more realistic and is more fun.
9. Impact Effects
Let the player know he hit something, don’t just remove the bullets. Like fragments falling off the wall if a bullet hits it or blood strains if a character gets hit by a bullet.
10. Hit Animation
Let the player know that he damaged the enemies. The simplest trick is to make the enemy flat white for a fraction of a second.
11. Enemy Knockback
But knockback force if you hit enemies. Your weapon feels so much more powerful and makes it more realistic from a physical point of view.
12. Permanence
Don’t remove dead bodies, it helps you remember if you come back in a room with a huge pile of dead bodies in it.
13. Camera Lerp
Smoother cameras make the character feel more in motion.
14. Camera Position
Your camera focus on important things in your video game. This is one of the hardest part and takes a lot of trials and testing.
15. Screen Shake
This is an important rule add screen shake on explosions it looks so much more powerful than without.
16. Player recoil
Shooting feels much more powerful with recoil on the player and you can use it to avoid that player do not shoot all the time as it has a drawback.
17. Sleep
If you set a deadly hit sleep for 100 or 200 ms, it puts more meaning in that action. Brawl games do that a lot.
18. Gun Delay
Make the character and its props look like they have weight/momentum when moving.
19. Gun Kick
Add recoil to things that would have it.
20. Strafing
If you shoot and change the direction the shooting will be still in the same direction until you stop shooting to turn around the gun.
21. More Permanence
Put ejecting shells in your game and make them permanent. It also helps to remember that you were in that room and that you did shoot a lot.
22. More Bass
Add bass to your shooting and explosions they get much more meaning and power.
23. Super Machinegun
Try ridiculous variations on how shooting performs, maybe three bullets a time, go crazy.
24. Random Explosions
That is a funny one but it puts more action in your game if you put some random explosions to your game when you shoot enemies, don’t overdo it.
25. More Enemies
You tuned up your gameplay so that you got the feeling you do have not enough to shoot at.
26. Even Higher Rate of Fire
Because it is more fun to shoot
27. Even Higher Rate of Camera Kick
Make your camera kick in the direction of the action/shooting.
28. Bigger Explosions
Seriously, who doesn’t like explosions?
29. Even More Permanence
Put some dust after your gigantic explosions and let it fade slowly.
A collection of level design patterns, which might be helpful for someone.
Patterns
Safe Zone
A safe zone is a pattern that refers to an area where the players are not exposed to danger. A Safe Zone gives the player the possibility to analyze the surroundings and plan their next actions. A safe zone is especially important at the starting point of the avatar.
When you enter a level you always should be in a safe zone where nothing attacks or threatens you. No enemy should be able to enter the safe zone, it’s upon the player to leave the safe zone.
When you enter a level you always should be in a safe zone where nothing attacks or threatens you.
My rooms for All Fucked Up start always in a safe zone means no hazard or enemies will enter that zone. I will use leap of faith jumps for storytelling and therefore I will soften the strict rules for the safe zone a little bit. It will be guaranteed that there is no hazard or enemy at the landing point which would kill you instantly. The player should have enough time to react and have the necessary amount of ammunition and weaponry. As well a leap of faith jump will never be at the end of a room or level. Combined with the fast and endless respawn this should be acceptable.
Guidance
Guidance is a pattern that refers to the use of non-verbal game elements to guide players in an intended direction. Guidance is especially important for explorative games.
Guide the character through the level shape from the start to the end. Besides gangways, shafts, and entry/exit doors, also enemies or collectibles can be used to guide the player through the level. But as well cracks in a wall can indicate that with a certain amount of force you can destroy that wall to enter a new room.
My levels have entry and exit points in rooms that are not too big. I plan to have hidden entries to bonus rooms and those I have to somehow decorate with a guidance pattern like destroyable blocks and walls.
Branching
Branching is a pattern that refers to providing the players with multiple paths to reach their goals.
Not just one possible path but a couple of possible paths. You can have difficult but faster ways through for experienced players or simpler but slower paths for beginners.
Alternative ways to kill your enemies.
For All Fucked Up I recently found another way of branching, not in the sense of alternative paths but alternative ways to kill your enemies. I started to work on a level with falling blocks and the blocks start to shake for a sec and fall down as soon I’m underneath them. If I can lure my enemies underneath the falling blocks and manage to save my ass in time I can kill the enemies without a gun. I can now think of more ways like this, like shooting fuel barrels near enemies and letting them be blown away.
Foreshadowing
Safely introduce a new enemy for example, by showing the new enemy in a safe way before it attacks you.
There are different ways to introduce new enemies, threats, or hazards. One way is to combine Foreshadowing with the Safe Zone pattern, the player is placed in a safe spot where he can observe the new enemy, threat or hazard and plan his action. Even new possibilities could be introduced that way, like the trampoline or the moving platform in celeste.
One way is to combine Foreshadowing with the Safe Zone pattern.
In All Fucked Up fast respawn after death, endless lives, and short levels make it quite easy to get knowledge of new enemies and threads. All my threads and enemies are introduced isolated at the beginning of a room, this gives the player an easy way to figure it out as he gets respawned right away after he gets killed by the new threat or enemy.
Layering
Layering is a pattern that refers to combining multiple game objects to create a new experience or challenge.
This pattern is most often combined with Foreshadowing. For example, introducing a new enemy separated and then combining them in a flock or together with already introduced enemies, threats or hazards. This gives the game new challenges.
In All Fucked Up I combine a lot the Foreshadowing and the Layering pattern. One example are the falling blocks. Whenever the player is underneath a falling block the block starts to shake for a sec and fall then down and smashes everything underneath also enemy entities. The player can combine the falling block in his tactic to smash following enemies.
The player can combine the falling block in his tactic to smash following enemies.
Pace Breaking
Pace breaking pattern refers to purposely changing the dramatic arc of the game.
Changing the surroundings or the sound for example when a boss enters the scene. Or to slow down the game for short moment to give the player time to prepare for the next wave of enemies.
In All Fucked Up I have some silent moments when finishing a room by adding a longer corridor where you just walk. But as well by environmental sound change. For example in the hall of hydraulic hammers you hear the hydraulic sound when the hammers lift and the boom noise when the hit the ground.
Proxy
Proxy is a pattern that refers to indirectly triggering an action.
Switches that open a door or unleash an event. The switch is not directly connected. Or an invulnerable enemy which I can only be kill by destroying a power supply. Fuel barrels which explode if you shoot at it. And more.
In All Fucked Up I introduced smart cards which you need to open the door to the next room. Those smart cards are carried by some of the enemies. This also should give the player the necessity to shoot those fuckers and not just try to avoid them.
Privileged Move
Privileged Move is a pattern that refers to the fact that not all objects do have the same impact on different objects.
Bullets from enemies do not damage enemies themselves only the player. Or an acid ground does not affect enemies but the decrease the players health.
For All Fucked up bullets from enemies only damage the player never other enemy entities. In case I introduce co-op mode I will do the same for the players that player bullets only damage enemies never the other player.
I get a small commissions for purchases made through the following links, I only have books in this section which I bought myself and which I love. No bullshit.
The lens #17, the lens of passion from The Art of Game Design: A Book of Lenses written by Jesse Schell. If you buy books through the links in this article I will get a small commission for that and no extra cost for you. The book is great and I think a must-have for every game designer.
This lens is about my passion for my game. I should ask this from time to time myself, like how do I feel about my game with the following three questions:
Am I filled with blinding passion about how great this game will be?
If I’ve lost my passion, how can I find it again?
If the passion isn’t coming back, shouldn’t I be doing something else?
I’m not always blinding passionate about my game, I especially have this reality check when I try to design a new level. It’s quite a lot of work to make a level great and joyful and sometimes reality kicks in and I’m like nah nope no not cool. But then I fiddle with it and try different styles and make it more narrow and more intense and I feel this joy and passion and I’m like yes it’s good it’s great.
So I do this reality check almost automatically and see if I still like what I do and still like what I see and play. COVID-19 didn’t help too much for the play testing something I would like to do on game conventions. Just to see if others would also like this little hero and his adventure.
If I lose the passion I usually find it again. Sometimes I just need a break or I need to look at it from a different angle or just make some fun prototypes and see if it would fit which is most of the time not the case. I also work every single day except Sunday on the game. It doesn’t matter if I just write down some ideas, make some sketches, brush up a level, improve a little bit the game-mechanic, or even remove something from the game. This everyday habit helps me a lot to keep the drive and the passion for my own game. And it is quite amazing to see how it develops when I compare it to the early stages and now.
The last question of what to do when I can not find my passion for my game. Well, I probably would then just finish it somehow but would not put too much work into it.
I get a small commissions for purchases made through the following links, I only have books in this section which I bought myself and which I love. No bullshit.
In the process of my game, I started to think about an advanced camera system. I wanted to define camera bounding boxes in which a certain type of camera is active. But this was not enough for me as I wanted them stacked. And I wanted to attach these camera bounding boxes as well on moving targets like enemies.
Why?
Well, I was thinking of a cool intro where the hero falls down a deep hole. I wanted to zoom close in the beginning and zoom out in the middle part and zoom in on the landing. Furthermore, I wanted to overlay camera bounding boxes to zoom in on certain objects or when I enter or leave a room or level. I was as well thinking of a centered camera for a squared room to see everything in it and as soon I leave this room I wanted my follow camera back. So it’s complicated. And then I thought OK would be cool to have a zoom-in if enemies approach me to give that more focus and this camera bounding box has to follow the enemy… of course.
So it’s all about the cinematic effects I guess.
How?
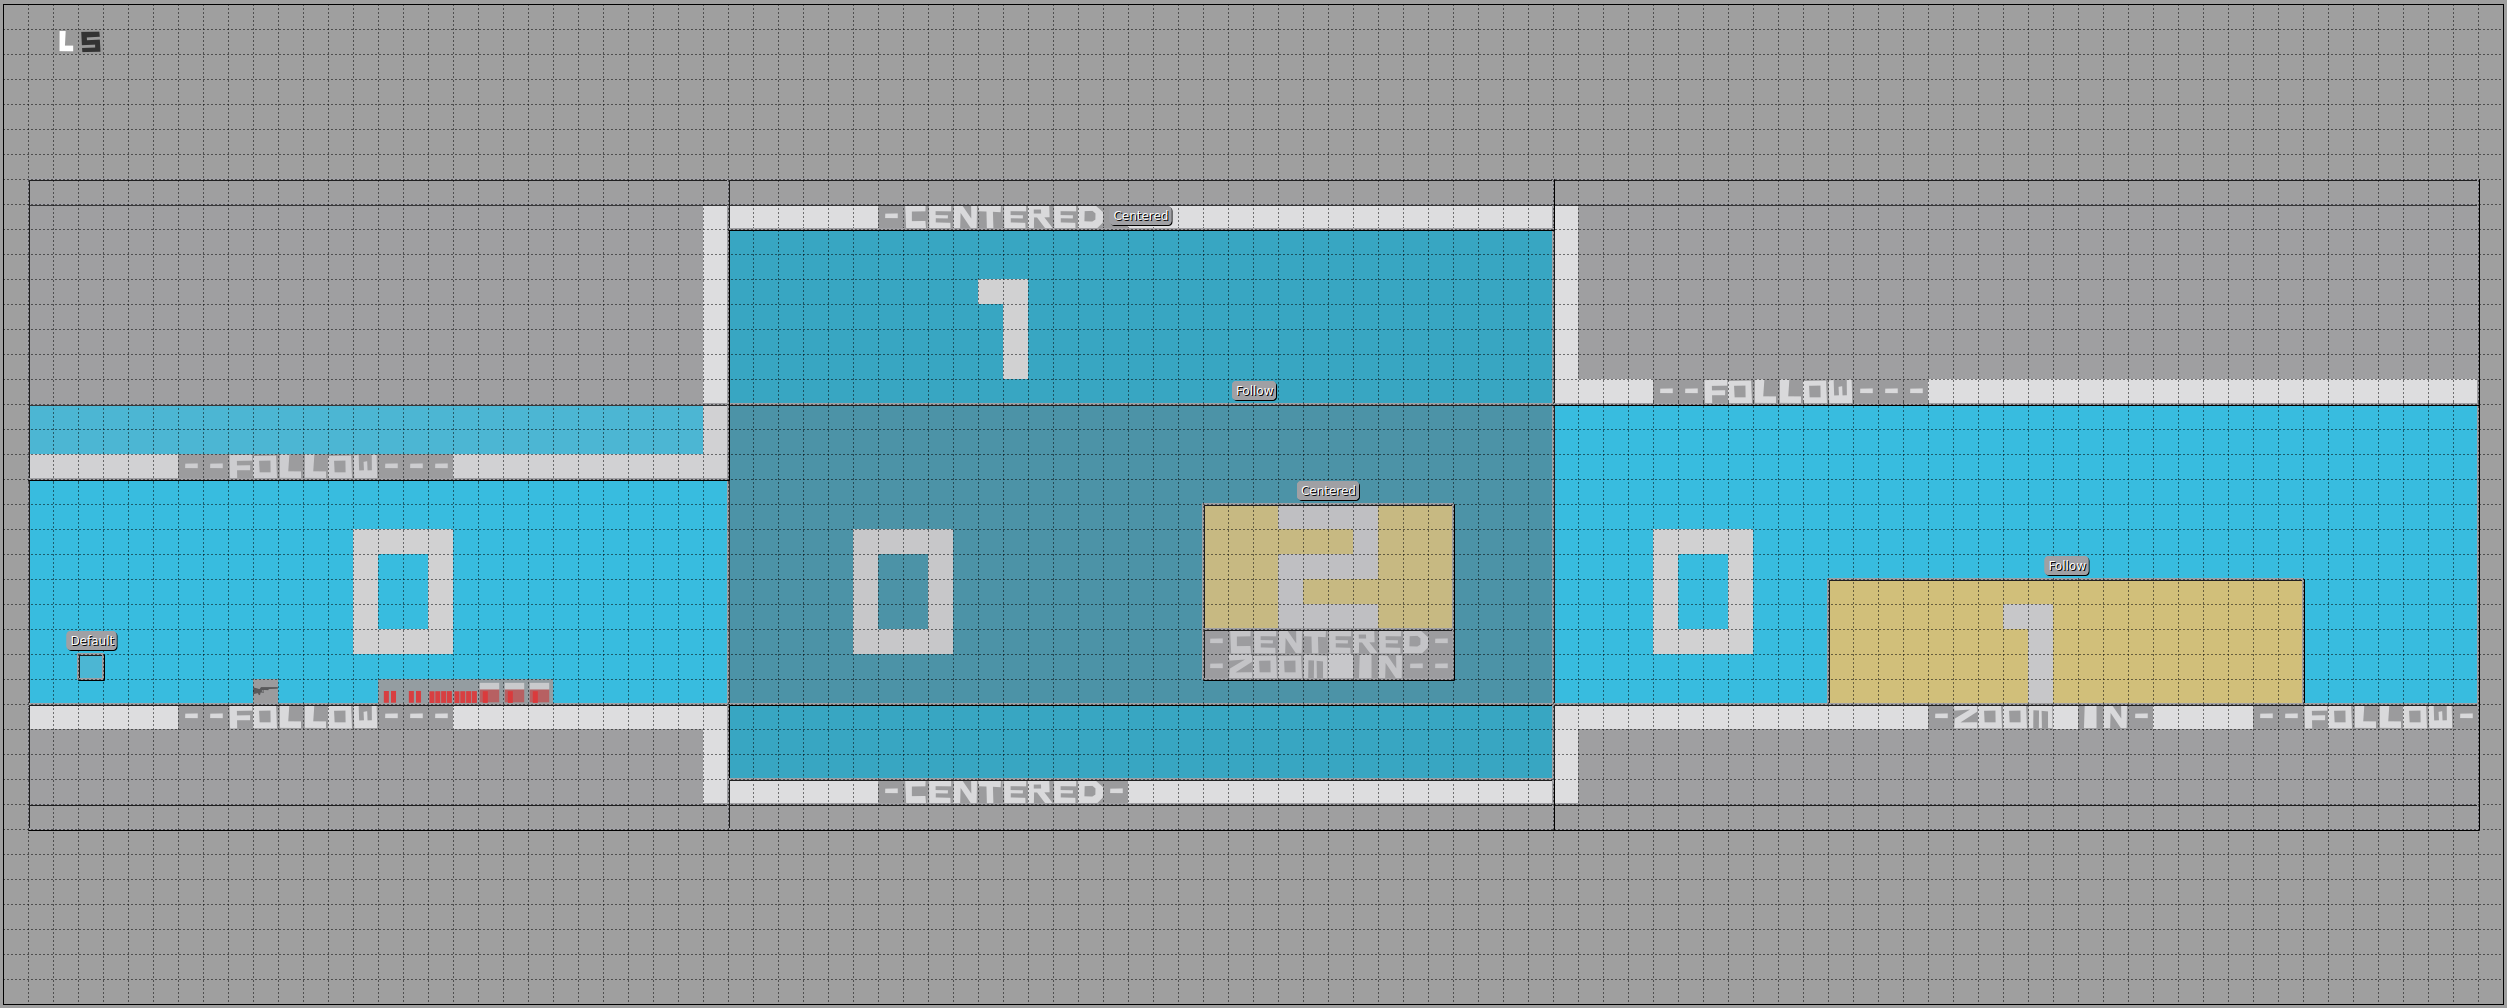
I think the best is a visualization of my idea.
I tried to describe it in the level itself. The long light blue bounding box across the full room contains a follow camera and is on the bottom of the stack that’s why it’s numbered with a ‘0’. The middle camera bounding box is darker blue and is on top of the following camera and contains a centered camera, which means inside this box the camera will not follow the character but point to the center of the bound box. This box has the priority ‘1’ and is on top of the priority ‘0’. On top of this, we have a yellow bounding box with a zoomed-in centered camera with the priority ‘2’. The higher the number of the bounding box camera the higher its priority. On the right, we see a yellow bounding box with priority ‘1’ which is higher than ‘0’ with a follow camera with a different zoom.
In Action
Now in action
This is pretty neat isn’t it?
Behind the Scenes
OK, I try to explain it with some pseudo-code. Let’s assume we have all the camera bounding boxes and their camera type. Furthermore, we can load these camera types on the fly.
public void updateCamera(float tpf, Vector2 playerPosition) {
    stream()
            .filter(cam -> cam.getAabb().contains(playerPosition))
            .sorted(Comparator.comparingInt(CameraAabbData::getOrder).reversed())
            .findFirst()
            .filter(cam -> cam.getMyCamera() != currentCam)
            .ifPresent(cam -> {
                LOG.debug("Enter camera area with cam data type: " + cam.getType() + " properties: " + cam.getProperties());
                if (cam.getMyCamera() == null) {
                    cam.setMyCamera((MyCamera) feather.instance(cam.getType()));
                }
                currentCam = cam.getMyCamera();
                currentCam.setAabb(cam.getAabb());
                currentCam.setProperties(cam.getProperties());
            });
    currentCam.update(tpf);
}
So in short
We check if the player is in the camera AABB
We sort the camera AABB due to its order
We just take the first, which means the top one (it’s ordered)
The next check is to avoid that we set the camera properties on every frame
And if there is a camera AABB we check if we already instantiated the camera (caching)
We set the current camera and its properties
Last but not least we update the current camera on every frame
A lerp function smooths the switch from one zoom to another
A follow camera for example updates its position depending on the character’s movement
Update other dynamic features of the current camera
The object “cam” is just a data holder and often referred as a DTO.
I did some micro blogging on twitter about Kanban and SCRUM
I had a discussion about Scrum and Kanban. I prefer kanban as the problem with half finished tickets does not occur. For small teams it’s easier to manage. With daily, grooming sessions and retrospective. I wonder what #gamedevs are using? #gamedev#indiedev#Scrum#kanban
It’s actually a fun topic and executed well can bring a team together to work on a project. It involves the whole team and can not just be dictated that is a very important part. And this involvement also increases the team spirit as everybody gets a voice to improve the process.
Kanban over SCRUM
I prefer Kanban over pure SCRUM because it solves the problem of half-finished tickets. SCRUM usually plans a set of tickets for a sprint and developers tend to try to finish all tickets within a sprint at all costs because it was promised to the customer. The problem with that is that either you skip unit tests to get stuff done in time or you do only 80% of the task which leads to follow-up tickets. It’s a lot of work to keep an overview and needs in my opinion a fully committed SCRUM master.
Kanban, on the other hand, does not plan a specific amount of tickets for the next sprint but over time you get an understanding of how long on average a ticket needs until it is done. This gives the team more freedom, leads to better quality, and reduces the stress on developers to finish tickets on an estimated time. Often the estimation is not even done by the developer who takes the ticket! And a ticket is done if it’s done 100% including testing. And Kanban has less overhead compared to SCRUM and fewer rules.
SCRUM Particles
But I like the idea of dailies, planning, and grooming from SCRUM. And always take care that a meeting has an outcome and is as short as possible. I don’t like meetings in general as usually it’s just chatting and complaining but not outcome-oriented. It needs a person which moderates a meeting and keeps the meeting on the topic at hand. It’s for example totally pointless to waste time talking about your code problems in a daily meeting, just state you have a problem with your code and then figure out who could help you. All the meetings have a specific purpose and the moderator should take care that all participants stick to that purpose and stop discussions that have to take place elsewhere.
Daily Chat
A daily should consist of the three statements
What did I work on before this daily
What do I work on after this daily
State the blockers I have
The first two points are to make sure everybody in the team knows what topic you are working on and the last point is about your problems and defines who can help you to eliminate them. The meeting should be quick and concise. Nothing is more boring than following a discussion you are not interested in. Imagine you also might have your game designer in your daily among some developers. If developers start to explain in detail their problem they waste the time of the game designer. I was in so many meetings where two people started to discuss a topic only they did understand and where I just thought ok I would like to go back and work now. And I’m sure I’m not the only one.
Planning the Sprint
I like the idea of sprints, but in the Kanban world, this can be more dynamic than in the SCRUM world. This means the stakeholders can influence the backlog stack by sorting it and the todo column of the Kanban board as well. This gives them a huge benefit in short-term decisions. The stakeholder can not influence tickets that are already taken by a developer except having serious reasons.
To make that work the developers must work the Kanban board from right to left and from top to bottom. Cherry picking is not allowed. This as well does have a huge benefit as the unwanted uncool tasks are evenly distributed on the team. It’s also very self organizing if all developer follow that rule.
The time a ticket needs from left to right on the Kanban board is at the beginning not clear. After 4 – 8 weeks it becomes more clear how long a ticket needs in average till it is done and then you also can calculate how many tickets you can do in one sprint of lets say 3 weeks and the stakeholders can see on the board what is in the next release for sure and what might be in the next release. Of course there will always be the case where a certain ticket just takes much longer than the average but will be less likely the longer you do Kanban.
Grooming the Backyard
This is the most valuable meeting in my opinion. It is important that all developers participate. The ultimate goal is to make sure that in the end, everybody understands the scope of the tickets you groom in the backlog. The moderator of the grooming meeting documents all the findings, howtos, and input them into the description of the ticket. As we always play planning poker on those tickets and you do not estimate the time but the complexity. There might be a ticket with a complexity of 0 or 1 but will take 2 weeks because it is a lot of work. You still can split such tickets if you know it might be a lot of work.
Hearts, Diamonds, Spades, or Clover
The planning poker can be played with physical cards or online like this one https://scrumpoker.online/. We used usually the schema Fibonacci series 0, 1, 2, 3, 5, 8, 13, 20, ?, or coffee. After a while it was clear to us that tickets which have complexity of 8 or more needs to be break up, but I think this is highly related on how a team understands those numbers. For us this became clear over the course of 3 plannings. We used the retrospective meetings for this kind of fine tuning. But it reflects the understanding in the team. If somebody put a high number which was higher than the rest he/she did explain his concerns as he/she might found something the rest of the team did not think of.
Retrospective
The retrospective meetings were mainly to improve the process i.e. how to work on the Kanban board when to do a review of a ticket, or if we need an additional column on the Kanban board among many more. Usually, every member of the development team did prepare a set of positive points on what went well and a set of negative points on what went not so well. For the negative points, he also prepared a possible suggestion on how to improve it.
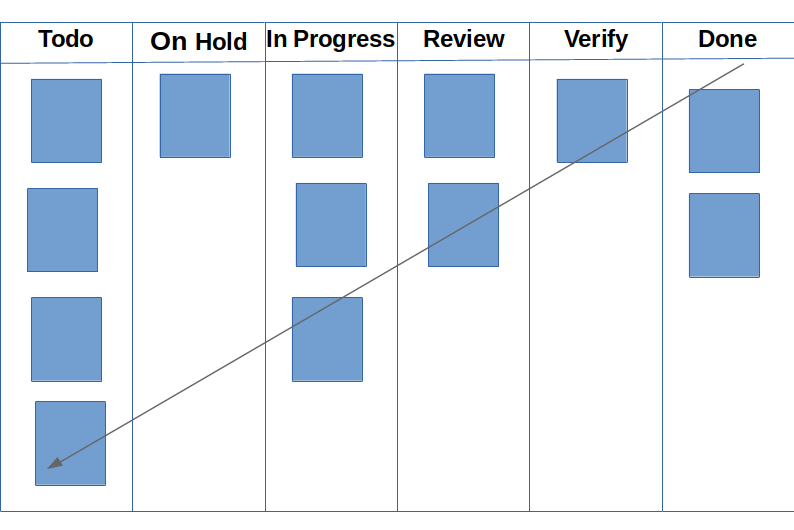
Kanban Board
The Kanban board should have at least a Todo, On Hold, In Progress, On Review, Verify, and Done slot. Every slot should be limited, we used the retrospective to figure out the best limits. The Todo should always have enough work till the next grooming session. The On Hold slot is for every ticket where people are blocked and need feedback or input. All tickets where somebody was working on are in the In Progress slot. If you pushed your stuff to your source repo you also moved the ticket into the Review slot. In case the reviewer did find issues you had to put back the ticket into In Progress. And if you finally managed to solve the ticket you had to put it into the Verify slot. The Verify slot stands for you have to install the product, game, plugin, whatever it is, and try out if it works or not. And it’s important that not the same person who worked on a ticket did the verification. The verification was a very good instrument to distribute the know-how in the team.
As I said in the previous chapter already, you work from right to left and from top to bottom on your Kanban board. So whenever I finished a task or came to work in the morning, I went on the board and had a look if there are tickets to verify. If yes I took one ticket after another and verified them until there was no work left for me. If everybody does it, it’s unlikely that I have to verify a lot of tickets in one go. Usually one or max two tickets. Then I go to the next slot and review all tickets in that slot. And if I was done with that I took my ticket from yesterday in the in-progress slot. If there is no ticket in the progress slot I took a look at my on-hold tickets. And if even there everything was done I mechanically took the topmost ticket from the todo slot and put that in progress. I do not even look what ticket this is, I just take it and deal with it.
After the fisheye lens shader turned out to be too extreme for All Fucked Up I looked for other lens shaders and found barrel distortion shaders which makes a similar effect like a fisheye but less extreme. It just widens up the lens. Looks totally cool. I got the best and simplest shader for barrel distortion here on github. It’s in a different format than I need it for jMonkeyEngine but was quite simple to adapt it.
I always start with the part I need to embed the shader in the code and as I do not make anything fancy or parametrized it’s fairly straight forward
package ch.artificials.bubble.system.mvc.view.post.filter;
import com.jme3.asset.AssetManager;
import com.jme3.material.Material;
import com.jme3.post.Filter;
import com.jme3.renderer.RenderManager;
import com.jme3.renderer.ViewPort;
public class BarrelDistortionFilter extends Filter {
     public BarrelDistortionFilter() {
         super(BarrelDistortionFilter.class.getSimpleName());
     }

     @Override
     protected Material getMaterial() {
         return material;
     }

     @Override
     protected void initFilter(AssetManager manager, RenderManager renderManager, ViewPort vp, int w, int h) {
         material = new Material(manager, "MatDefs/Post/BarrelDistortion.j3md");
     }
}
The referenced MatDefs/Post/BarrelDistortion.j3md holds the references to the shader code and also defines possible parameters which we want to hand over from code to the shader code.
MaterialDef Toon {
    MaterialParameters {
         Int NumSamples
         Int NumSamplesDepth
         Texture2D Texture
         Color Color
    }
    Technique {
         VertexShader GLSL100:   MatDefs/Post/BarrelDistortion.vert
         FragmentShader GLSL100: MatDefs/Post/BarrelDistortion.frag
         WorldParameters {
         }
         Defines {
             RESOLVE_MS : NumSamples
         }
    }
}
The vertex shader code is very simple and just hands over the tex coordinate and the position
I get a small commissions for purchases made through the following links, I only have books in this section which I bought myself and which I love. No bullshit.
I always wanted to write some shaders and I always procrastinated it. But now I did it. Finally. I got a good source for a fisheye shader and I adapted it for the jMonkeyEngine which was not too hard.
Fisheye.j3md is the thing which holds everything together. This is jMonkeEngine specific and may look different for your game engine you use. This just holds the two shaders files together and it’s the place where you can specify the parameters which you need if you want to handover values from the code the shader pipeline.
MaterialDef Toon {
 MaterialParameters {
     Int NumSamples
     Int NumSamplesDepth
     Texture2D Texture
     Color Color
   }
   Technique {
     VertexShader GLSL100:   MatDefs/Post/Fisheye.vert
     FragmentShader GLSL100: MatDefs/Post/Fisheye.frag
     WorldParameters {     }
     Defines {
       RESOLVE_MS : NumSamples
     }
   }
 }
Fisheye.vert is the vertex file and here I had to adjust the fact that jMonkeyEngine hands in the position as inPosition and as well the texture coordinate as inTexCoord. The example I got was for another game engine where the input UV was a vec4. To avoid having to change too much I packed the vec2 inTextCoord (which is basically the same thing as the vec4 UV) into a vec4 even tho in the end the fragment file will only use xy means the vec2.
There is a little bit of Java code involved to be able to add the filter as post filter. This is most likely different for your game engine.
package ch.artificials.bubble.system.mvc.view.post.filter;

import com.jme3.asset.AssetManager;
import com.jme3.material.Material;
import com.jme3.post.Filter;
import com.jme3.renderer.RenderManager;
import com.jme3.renderer.ViewPort;

public class FisheyeFilter extends Filter {
    public FisheyeFilter() {
        super(FisheyeFilter.class.getSimpleName());
    }

    @Override
    protected Material getMaterial() {
        return material;
    }

    @Override
    protected void initFilter(AssetManager manager, RenderManager renderManager, ViewPort vp, int w, int h) {
        material = new Material(manager, "MatDefs/Post/Fisheye.j3md");
    }
}
And this is the effect. Not too nice but a good starting point to play with this shader.
I get a small commissions for purchases made through the following links, I only have books in this section which I bought myself and which I love. No bullshit.
We use cookies on our website to give you the most relevant experience by remembering your preferences and repeat visits. By clicking “Accept”, you consent to the use of ALL the cookies.
This website uses cookies to improve your experience while you navigate through the website. Out of these, the cookies that are categorized as necessary are stored on your browser as they are essential for the working of basic functionalities of the website. We also use third-party cookies that help us analyze and understand how you use this website. These cookies will be stored in your browser only with your consent. You also have the option to opt-out of these cookies. But opting out of some of these cookies may affect your browsing experience.
Necessary cookies are absolutely essential for the website to function properly. These cookies ensure basic functionalities and security features of the website, anonymously.
Cookie
Duration
Description
cookielawinfo-checkbox-analytics
11 months
This cookie is set by GDPR Cookie Consent plugin. The cookie is used to store the user consent for the cookies in the category "Analytics".
cookielawinfo-checkbox-functional
11 months
The cookie is set by GDPR cookie consent to record the user consent for the cookies in the category "Functional".
cookielawinfo-checkbox-necessary
11 months
This cookie is set by GDPR Cookie Consent plugin. The cookies is used to store the user consent for the cookies in the category "Necessary".
cookielawinfo-checkbox-others
11 months
This cookie is set by GDPR Cookie Consent plugin. The cookie is used to store the user consent for the cookies in the category "Other.
cookielawinfo-checkbox-performance
11 months
This cookie is set by GDPR Cookie Consent plugin. The cookie is used to store the user consent for the cookies in the category "Performance".
viewed_cookie_policy
11 months
The cookie is set by the GDPR Cookie Consent plugin and is used to store whether or not user has consented to the use of cookies. It does not store any personal data.
Functional cookies help to perform certain functionalities like sharing the content of the website on social media platforms, collect feedbacks, and other third-party features.
Performance cookies are used to understand and analyze the key performance indexes of the website which helps in delivering a better user experience for the visitors.
Analytical cookies are used to understand how visitors interact with the website. These cookies help provide information on metrics the number of visitors, bounce rate, traffic source, etc.
Advertisement cookies are used to provide visitors with relevant ads and marketing campaigns. These cookies track visitors across websites and collect information to provide customized ads.